What are some things inspiring you this week? Fall is such an inspiring time of year! Thanks so much for visiting,
xo, Em
P.S. Also in case you missed it, click the red button below to Subscribe on YouTube! | and if you're a previous FB follower or would simply like to connect that way, click the 'Like' button below! xoxoxo
-Some days I wake up to at least a load of dirty dishes that are left-over from last night because I was just too dang tired to finish them before falling asleep, -Some days its 40 degrees outside and I just want to stay inside with some hot chocolate, but I know that I have groceries to buy so start thinking about where all the kids coats are, and if John even has one, -Some days I realize I could have a new baby in two weeks and I have loads of things waiting to be sewn for her piled up on my sewing table that aren't finished or even started yet,
-Some days all I can see around the house is what's out of order, and so I make grand plans for cleaning the entire house after our little grocery run, -Some days my hair is a birds nest of frizz and tangles so I put it up in a messy bun to hide it away, -Some days I really want adult company, and at the same time want to be all alone, -Some days there are 4-6 loads of dirty laundry stacked by the washer waiting for me, -Some day's we're completely out of bread in the house (heaven forbid) on the days when I Really just want some hot toast and a mug of tea, -Some day's I'm so behind on emails and messages that I start drafting a blog post about how I'm going to conquer them (because that's how we make commitments:)), -Some day's I hear the smoke alarm beeping at me to change it's batteries, but I'm too big and pregnant to get up on a chair, so on it beeps:) -Some days nothing seems to be fitting right except for my yoga pants and a big t-shirt, And some days (days like today) all those things happen at once, so I write them out in a blog post, then go on to find the coats, buy the groceries, clean the dishes and laundry, make the bread, maybe sew a little, and tell you how I'll be back again tomorrow with a 'real' blog post:) Have a great day wherever and in whatever temperature you're in! xo, Emily
P.S. Also in case you missed it, click the red button below to Subscribe on YouTube! | and if you're a previous Facebook follower or would simply like to connect that way, click the new 'Like' button below:)
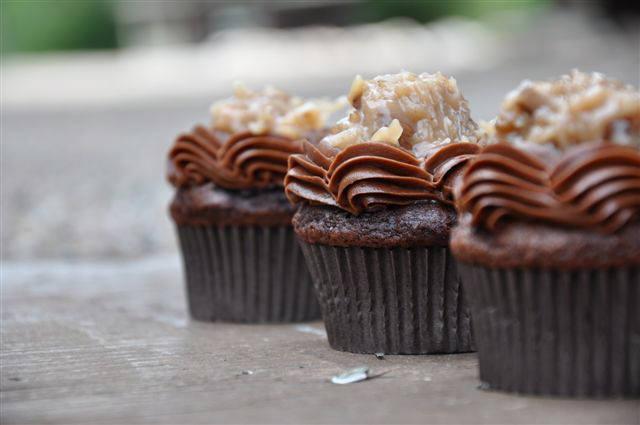
Hey everyone! So as you know we had the first day of Autumn come and go a few days ago, and that means that no matter how hot it is where you are its time to start celebrating Fall! ven if it means baking cinnamon rolls in cut-offs and a crop top:) So today I thought I'd share a few of our favorite recipes for Autumn (and winter for that matter) that are here on the blog already in the hopes of getting you *even more excited about all the Fall treats ahead!
P.S. Also in case you missed it, click the red button below to Subscribe on YouTube! | and if you're a previous Facebook follower or would simply like to connect that way, click the new 'Like' button below:)
Hey you guys. I am SUper behind on posting this mix tape for the month of September, but 'better late than never' has sorta been my mantra for, well, forever so.. :) At any rate, if you're new to my mix tapes then its pretty self explanatory but they're just a little way of sharing some of my current favorite tunes with you while giving a little nod to the good ol' days when we would make our own mixed tapes with a side A and side B, you know, to play in our cars or tape players, or walkmans? haha So, since I started doing these last year I've progressed to having an actual player right in the post for your listening convience! Also I've made the playlist so you have to scroll down for side B:) Enjoy!
There you have it! Music is so so important and loved around here, and listened to around the clock, so I hope you leave a few favorites of yours in the comments because I love finding new loves! In turn I hope you've found a new song or two that you like and or enjoyed a few old favs. Also if you're new to the mixes and wanna check them out then follow this link to see the rest. Have a great day, and thanks for visiting!
xo, Emily
P.S. Also in case you missed it, click the red button below to Subscribe on YouTube! | and if you're a previous Facebook follower or would simply like to connect that way, click the new 'Like' button below:)
Hey everyone! Happy Monday and all that:) I know a lot of peeps hate Monday's because it means back to work or class or whatever, but for me it means a fresh to-do list and chance to start over with my goals and such. Also it may have something to do with the fact that I love starting giveaways on Monday's and that always gets me excited! This week I've collaborated with a bunch of favorite fashion bloggers to bring one of you seriously lucky ladies the chance to visit a loved one, or travel to a city you've always wanted to explore! Holy awesome right?! Follow the links to visit these fabulous participants!
Such a gorgeous and inspiring group of ladies, and I'm so happy to be among them for this giveaway! I know these group collaboration giveaway's may seem like they're a dime a dozen lately, but you try telling that to the winners! haha There can never be too many giveaways for amazing prizes like this in my opinion, don't you think so? So now if you're wondering how it all works, the prize package includes $290 for flights which can be used towards any flight within the US, a $250 Visa Gift Card for some extra spending money, and lastly a $100 of store credit to KiKi La'Rue! Because everyone needs a fab new outfit to wear on vacation right? Use the Rafflecopter below to enter:
a Rafflecopter giveaway And that's it! Thanks so much for visiting The Freckled Fox today, and I hope this helps brighten your potentially sucky (but hopefully not) Monday:) and now you should be thinking where you would go? xo, Emily
P.S. Also in case you missed it, click the red button below to Subscribe on YouTube! | and if you're a previous Facebook follower or would simply like to connect that way, click the new 'Like' button below:)
Hey my peoples. I know that for every 'fall is here' picture I post on instagram there are tons of you who talk about weather in the 90's+ so i'm sorry if its getting a bit old! We just had to turn on the heater in the car for the first time this past week, and I just love autumn so much and there have been so many things coming this season we've been looking forward to all year I'm just so excited that its finally beginning for us! This hat and coat have been going a lot of places with me lately, as have my brown boots and cozy socks, and I'm feelin like its time to bring on the apple cider and pie!
Thanks so much for reading, and I'll see you tomorrow for a big post!
xo, Emily
P.S. Also in case you missed it, click the red button below to Subscribe on YouTube! | and if you're a previous Facebook follower or would simply like to connect that way, click the new 'Like' button below!
Hey guys! So today's tutorial is the last in the series, and even though the weeks been pretty busy and it seems like it's passed quickly, I've been anxious to finish up and bring a little more variety back to The Freckled Fox:) At any rate starting tomorrow, that variety is coming right back! I hope you've not been too bored though with all this hair, and more than that I hope you love the closing tutorial like I do!
You like? This could easily be called something like The Victory Roll Faux Hawk, or The Mass of Vintage Hair Rolls, or Hot Rockabilly 'Buns' etc haha, but in the end its just a really fun and slightly more modern pin-up style that I've been thinking about doing for a long time! I'm really excited to finally be posting for your viewing and styling pleasure so lets get started, follow the pictures religiously, and enjoy!
Supplies needed:
- clips or pins for separating hair
- 1 1/2 inch curling iron
- heat protectent glove
- shine serum
- bobby pins
- good hairspray
- brush
- boar bristled teasing comb
Method:
Step #1: Alright we're gonna start with smooth hair, and have your clips or pins ready for a bunch of sectioning! The first one will be the bang section from eyebrow to eyebrow and up around in a curve. Next you'll grab the section from the back of your curve straight to your ear, and the same on the other side and pin. Next you'll split the rest in half, divide the top part of That in half, and pin up. Divide the bottom into thirds and pin up the two sides, but leave the middle out to deal with first.
Step #2: To create your first curl: brush the hair smooth, rub on a little shine serum for added smoothness and move on to clamping the ends of your section in your iron and rolling all the way up to your scalp! clamp and release your iron as you gently pull it out of your curl while holding the curl with the other hand. Turn the curl sideways so the hole is pointing outwards, and pin it right in the middle a couple inches up from the bottom of your hair.
Step #3: Take the section to the left of your first roll and repeat step #2 with it, only this time pinning the roll up and over to the other side of the first roll. Moving on to the next (to the right of the first), bring it up and over the first two. Making sense? Move on to the section on your right temple and bring it forward almost to your forehead and right of the middle. Move onto the section right below that one and pin it up and across, falling to the left of your middle section. Almost done! :)
Step #4: Next is your left temple section which you're going to position in the gap behind the one you just finished, and move on to your front section! Comb the underside smooth and wrap the hair around your iron so its going away from your face and upwards. Make sure to smooth all your fringe or flyaway's into it as much as possible, release, flatten, smooth, pin, and spray! Done and done! I added a couple flowers to the side as a little somethin extra, but of course they're optional to the look:)
And there we have it! I always make these look harder than they actually are I think, so be fearless in your styling and again just remember to follow the pictures and texts as you complete each step. Also a good thing to remember with this style is that its very customizable! If you place your buns in slightly different areas than I do or are worried about precision, don't be worried! You're still going to end up with a great style, and as long as they're victory rolls then its going to be pin-up-y and retro looking:)
Thanks for following along this week and for all those of you who left feedback and questions etc, I love talking with you about my posts and hearing what you have to say! Again I'm excited about leaving the routine of hair day after day that I've been in this week, but I hope you've enjoyed the posts as I have!
Thanks for readin loves,
xo, Emmy
P.S. Also in case you missed it, click the red button below to Subscribe on YouTube! | and if you're a previous Facebook follower or would simply like to connect that way, click the new 'Like' button below!
Morning everyone! Its been a crazy week around here off line, and such a fun one for me on the blog! I know that these retro tutorials are more for special occasions and not every day like the styles I normally post, but perhaps that why being elaborate once in a while feels so refreshing? Here's today's:
I almost feel like I should apologize in advance for how detailed this tutorial is going to be, because I've never posted one with so many steps before! I'm not sorry though, because this is probably my favorite retro tutorial of them all, and I'm so excited that I finally get to present it to you!
There are a lot of different things I could have called this, because its the perfect style for a any retro/vintage party or Mad Men premier, or with Halloween coming up soon its certainly the the key element for that Marilyn Monroe or Elisabeth Taylor costume! My hair does touch my rump but its pretty thin so don't go thinking that if its shorter that you'll have a harder time, because obviously its a faux bob tutorial, and if you already have short hair, then you're that much closer to achieving it!
Step #1: Start by separating your smooth brushed hair in half by drawing a line from ear to ear, and tying the back half up for later. choose a dramatic side part from the front section and tuck back the smaller side for later as well. Begin your pin curling by rolling the curls as flat as possible, and Away from your part. You're going to curl in 1 inch sections, going in little rows. Each 1" square (approximately) section you're going to wrap around your clipless curling iron (or around both the clip and the barrel of a regular curling iron) and hold for a few seconds before sliding your iron out leaving the rolled curl in your hands, and you're going to pinch the curl together and secure to your scalp with a single or double pronged clip, or with a bobby pin. and move on to the next!
Step #2: Once you've finished the front of your head with the curls pointing down either side start curling the back section by dividing it in half horizontally, then creating your pin curls from the top to the bottom, and pointing downwards. Once your whole head is covered in the pin curls, wait about 20 minutes more for the curls to cool and set completely before letting down the bottom level of curls.
Step #3: Grouping them into sections of 3-4 curls, take your comb and combine them all together by combing from the roots to the ends a couple of times (pulling the hair taught), then slowly letting the curl settle back up into place (if you have shorter hair this is where you really have the advantage over ladies like me!). To begin shortening your locks, roll the bottom a bit to get rid of the ends and gather the whole curl in your palm, tuck it close to your head and pin in place at the height of your choosing.
Step #4: once you have a whole level complete, spray well with some good hairspray, and move onto the next level of curls! Make sure you're combing the curls from the underside to pull the hair away from your face. When you get the the section of curls at your crown, tease a bit at the roots before combing out that section.
Step #5:To finish off the whole look, pull the front corner curl (from the smaller side) taught and tuck it by your ear. Tease the last three top curls at the base and then comb them out together. To complete the bangs comb the very front straight up, pinch the crease, and then comb back down and curve the hair under itself. Pin well, spray, and you're all done!
After all that and I still wish that I could be more thorough in the instructions, so for sure ask if you have any questions! Remember that layers are only helpful for this style though not necessary, and I have side-swept bangs, so don't let that stop you either! Remember though that pin curls are pretty ambitious and a little more time consuming than most styles, so its not for the faint hearted:) but definitely for those mad men parties! Just don't start them on a day when you're short on time. In the end its really about having fun and just playing with your hair till its laying how you like it!
Thank you all so much for the sweet comments and feedback by the way, and I look forward to posting more regular things again starting next week! Have a great day guys:)
xo, Emmy
P.S. Also in case you missed it, click the red button below to Subscribe on YouTube! | and if you're a previous Facebook follower or would simply like to connect that way, click the new 'Like' button below!
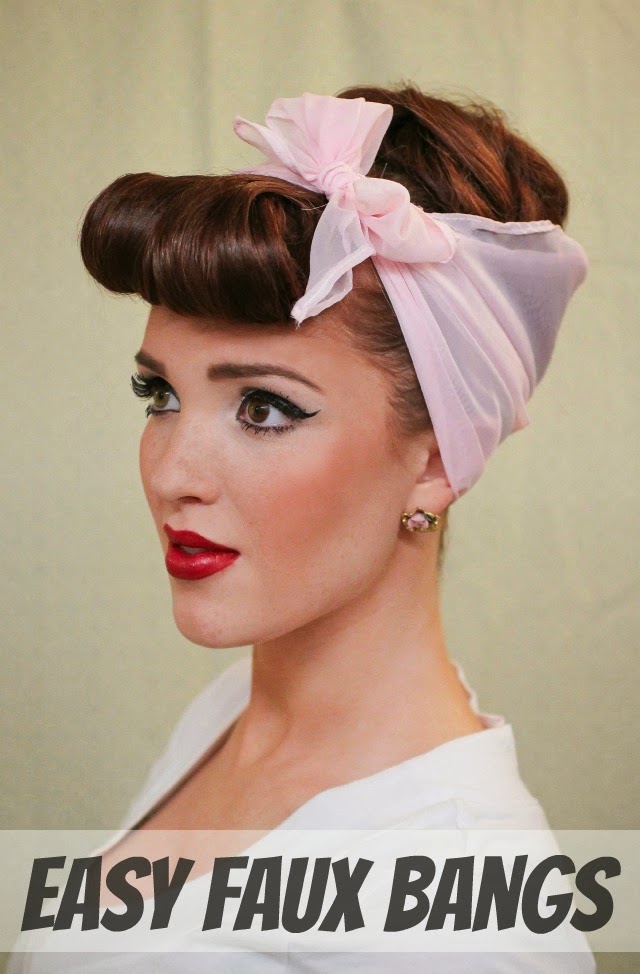
Hey everyone! I really love #4 in the series, and I hope you do too! These weeks always go by so fast because its just ticking tutorials off one by one till the week's over, and now we're more than haveway done! This is such a fun way to wear your vintage scarves, and this is the fastest style yet this week!
And that's all there is to it, so have a great day! :) Seriously though there's really not much more that I can say about the style other than if you've been wanting to try something retro and pin-up-y but aren't very confident to take one on, this is the style you've been waiting for! You don't have to use a vintage head scarf either, you can for sure use a bandanna or something like it, and it'll work out just great!
Supplies needed:
- boar bristled teasing comb
- 1 1/2" curling iron
- bobby pins
- strong hold hairspray
- a hair-tie
- clip for holding top back
- headscarf or bandanna
Method:
Step #1: Section off your bang section by drawing a half moon (?) from eyebrow to eyebrow and tying it up for later. Brush your hair back into a smooth high ponytail. Pull your hair all the way through the hair-tie twice, then on the last time leave the last several inches of hair in the hair-tie, creating a big loop. Wrap the extra hair around the base of the loop and pin in place. Use half a dozen or so more bobby pins to pinch and secure different parts of the loop, creating a little bumby bun high up on the back of your head. Remember that it doesn't have to be perfect, because it will be mostly covered by your headscarf.
Step #2: Spray well with hair-spray, and move on to the bangs! Bring down the front and work the sides of the section to smooth the flyaway's, then smooth the top and the bottom with a round brush. Clamp the ends of your bang section into your iron and spread the hair the whole length of it. Roll it all the way up to your roots and rub the loos hairs down with the others. Release your hair from the iron by clamping and releasing over and over as you slide the iron out. Now look at your lovely faux bangs!
Step #3: Use a couple bobby pins to secure the them by putting your fingers inside the roll and inserting the pins towards the back. Mold them a little if desired by pinching and tugging the the outsides outward and up slightly. Next take your scarf and double it over from opposite corners.
Step #4: Wrap it around the back of your head with the corners pointing upward. Tie a neat little bow at an angle and tuck the back point down into the rest of the scarf. and you're all done!
I know I always say it, but the best part of doing these hair tutorials is hearing your feedback and thoughts on what you think, what you used it for, how it turned out for you, and of course all the compliments you got when you wore it out! So free to share:)
Thank so much for reading!
xo, Emily
P.S. Also in case you missed it, click the red button below to Subscribe on YouTube! | and if you're a previous Facebook follower or would simply like to connect that way, click the new 'Like' button below!