


Hey friends! Today's post is going to be fun because I'm sharing a quick little tip that falls into the blogger code/html/css category, and I've never done that sort of post before! I don't pretend to be any sort of genius or anything when it comes to code, but I do know a lot of the basics that I had to teach myself through lots and lots and lots of study and research, trial and error, and long nights with bottles of tylonal.haha At any rate I get frequent emails about little blogger basics, and so I'm happy to start sharing some with you once in a while:)
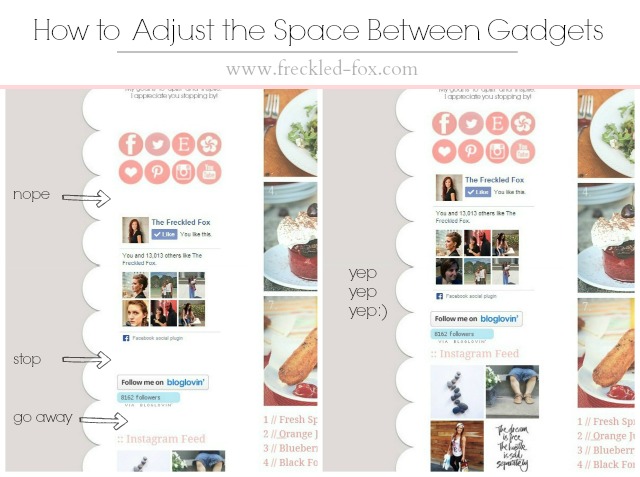
Today's tip is something that made a huge difference in the overall appearance of my blog once I figured it out, and I've gotten a fair amount of emails about this one, so I'm excited to finally post it!! I believe that there is a default of about 35 pixels between its sidebar gadgets, which as you can see in the before is just way too much(at least for many of us), but any info I came across on the subject was telling me to go into the html of my blog which is something I try never to do if I can help it.haha So, in five easy steps:
// How to Adjust the Space Between Gadgets
Step #1: From your blogger dashboard click on Template, then the orange square Customize button,
Step #2: Then the Advanced, and then scroll to the Add CSS button at the bottom.
Step #3: Copy from my page and paste the following code into the box:
.widget {
margin: 5px 0 0 0;
}
Step #4: From here, change that 5 to 15 or whatever till you find a distance you like (the test page will respond immediately). you can come back and change it whenever you want!
Step #5: Once you're happy with the result, click the orange Apply to Blog button in the upper right corner, and you're all set!
So I hope that for those of you who have been eyeing that space in-between your gadgets wishing it would just go away, that you can breath easier knowing that you don't have to take drastic measures to make it happen! This is a tutorial for Blogger, so I'm not going to guess and say it would work the same in wordpress or other hosts. Maybe it since code is pretty universal it would be just fine? you tell me! haha
Anyway's thanks so much for reading today, and if you have any questions please feel free to ask me anytime and also I love receiving your emails with your thoughts and requests, etc, so hit me up!
Have a great day friends,


Thanks for this, Emily! I wish popular bloggers would share their CSS/HTML know-how more often, so I appreciate your doing it :)
ReplyDeletedance a real
Great tips! You should do more of these because you never know who needs help. :] // itsCarmen.com ☼
ReplyDeleteThis is a great tip. When I have some extra time I'm so going to have to do it! -Hanna Lei
ReplyDeleteVery useful post! Thanks for sharing and I am looking forward to more posts like this one :)
ReplyDeleteXO,
Pam
www.classypam.com
Instagram
Twitter
Bloglovin'
Pinterest
Thank you for sharing that tip ! I was searching for a way to reduce the space between the gadget blocs but I stopped my researches when I totally change my template ! But I think I will go back at the old template if I do better designs. Css or html codes aren't as complicated people think ! :)
ReplyDeletePlease excuse my english pouahaha ♥ love
Thanks! I will be looking into this more when I get a few minutes to sit down with it. I don't think I've seen a tutorial on this before, so it definitely helps!
ReplyDeleteThank you so much for posting this! I didn't know there was a way to fix that. Your tutorial was super easy to follow too!
ReplyDeleteGreat tip thanks for sharing!
ReplyDeleteMylovelylittleladybird.blogspot.co.uk
Thanks for sharing! This bothers me so much!
ReplyDeleteJordyn
Pretty Lovely
That's awesome! Thanks for the tip!!! {thepaisleypeanut.com}
ReplyDeleteWhat a great little fix!
ReplyDeletexx Kelly
Sparkles and Shoes
Thanks Emily! This was super helpful!! xx
ReplyDeleteThanks sis........
ReplyDeleteThank you so much! I've had this exact same issue and had no clue how to fix it. Your solution fixed it and it was super easy. I appreciate it! -Sarah at lifeshouldcostless.com
ReplyDeleteThank you Emily. Worked like a charm. Appreciate the tip.
ReplyDeleteThanks for this. It was exactly what I needed.
ReplyDeleteThank you this is what I have been looking for an easy to follow and no mumbo jumbo xx
ReplyDeleteThanks for the help!
ReplyDeleteSo easy to do. Thanks for sharing!
ReplyDeleteWonderfully helpful and *so* easy, thank you. Thank you, thank you!
ReplyDeleteThanks for sharing this,so helpful (http://oddxbeauty.blogspot.co.uk/)
ReplyDeleteThanks for this. 😊😊
ReplyDeletethat's great!! thx for sharing this how-to !! :D
ReplyDeleteGreat job! Like!
ReplyDeleteThat was so simple! Thank you for sparing me a massive headache!
ReplyDeletethank you very much
ReplyDeleteYou've made a wonderful explanation!:) Thanks for it!
ReplyDeleteWish you inspiration and creativity!:)
phone activity tracker
Great post.....simple and best combination of words which improve importance and strength of the post.....thank you
ReplyDeleteSSC Exam Tricks
THANKS IT WORKS GREATLY
ReplyDeleteMY BLOG
http://loadedjaka.blogspot.com
It works for me!! Thankyou very much.
ReplyDeleteLove from,
Malaysia. <3
...and 5 years later this still works! Thank you for this. You are a life/sanity saver! _/\_
ReplyDelete