


Morning you guys! I have a huge treat for you today: a brand new Hair Tutorial from the Queen of hairstyles, my good friend Christina of Hair Romance!! My sweet little Lydia is just two weeks old, but between all the snuggles and feedings and kisses she takes up more of my time than the other three put together right now.haha So while I'm working hard to get back on my feet and post regularly, I couldn't be happier to have my friend Christina bring you this elegant and easy hair tutorial. Can't you see it paired with a sparkly dress for a holiday party one day and then with a casual quilted vest and jeans the next? Love the versatility, and again, it's so simple! Well I'll stop jabbering and let you hear from the lady herself:)
Hi! I’m Christina from Hair Romance and I’m so happy to be sharing an easy
hairstyle tutorial for Emily on The Freckled Fox.
I believe your hair is your best accessory. That’s why I started Hair Romance, to
help you love your hair and have more fun styling it.
Everyone loves a ponytail. This is my braided twist to make your everyday
ponytail a little more styled. I'm calling it the Braid-wrapped ponytail.
----------------------------------------------------------------------------------
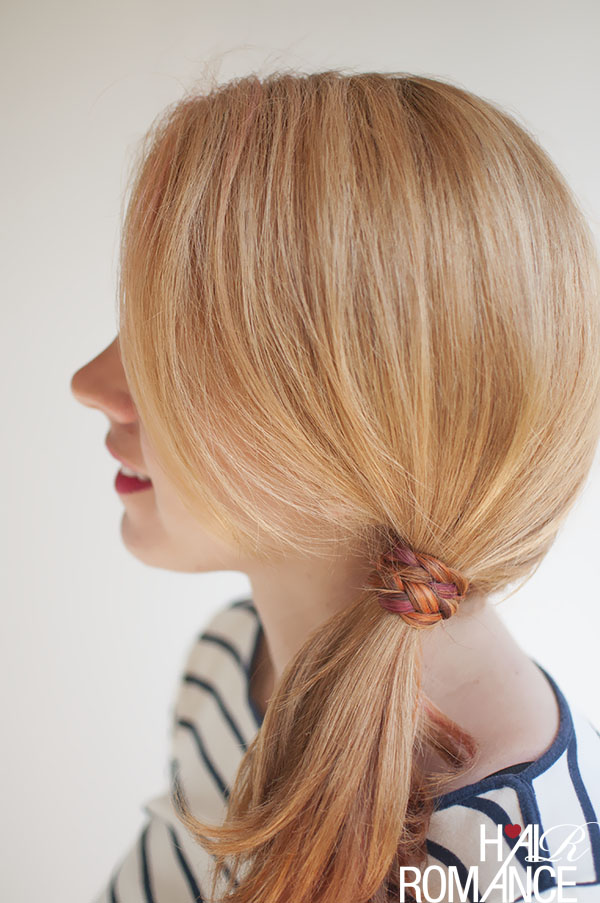
I love this as a side ponytail, but you can wear this as a regular ponytail at the back of your head too. My hair has been straightened for this style, but you’ll see on Hair Romance that I have really curly hair. This ponytail looks great with wavy or curly hair too.

What you need:
- Brush
- Small clear hair elastic
- Bobby pins
- Optional – extra hair elastic
Step-by-step:
- Brush your hair over to the side you want your ponytail to sit.
- Take a small section of hair, about half an inch, from underneath. You want to take a section from right on your hairline.
- Sweep the rest of your hair back and split the small section into three and form a regular braid.
- Secure the end of your braid with a small, clear hair elastic.
- Bring the rest of your hair back over your shoulder and wrap the braid around it to form a ponytail.
- Pin the end of the braid underneath to secure your ponytail in place. Cross two bobby pins over for extra hold.

Styling Tips:
This is my secret for ensuring the braid is pinned in place – put the bobby pin around your braid then just push it up underneath your ponytail to hold it in place. Then cross another bobby pin over this one if you need extra hold. If you’re finding it hard to keep your hair in place, try putting your hair in a ponytail first with an extra hair elastic. Then you can wrap your braid around the elastic and pin it in place.
--------------------------------------------------------------------------------------
I can't wait to try this myself! I haven't done a side ponytail in the longest time, and I already have a lot of ideas of how I could style this look during the holidays. Well anyway's I hope you loved this tutorial! My favorite part is how Christina's amazing colored highlights really make the braid pop. Also don't forget to check out her brand new hairstyle book Braids, Buns, and Twists that's available just about everywhere books are sold, and that yours truly has a few tutorials featured in it! How cool is that:)
Thank you so much for visiting, and be sure to come back often this week for loads of exciting new posts! It's gonna be pretty good:)
xo, Emily
P.S. if you're interested in seeing my new YouTube videos that'll be coming out soon, click below to subscribe! xo


Love this, so simple!
ReplyDeleteCarly
www.lipglossandcrayons.com
I love your hair color! -Hanna Lei
ReplyDeleteThat mix of hair color is awesome, I thought it was a fake hair piece at first! Awesome that its real!
ReplyDeleteI love this! It looks so pretty!
ReplyDeletethe-creationofbeauty.blogspot.com
How cute! and your red hair looks so amazing with it!
ReplyDeleteMakeover With Aspen
Ok, this just made my day! Love this look, I feel like I can tackle this so only time will tell! Thanks for sharing!
ReplyDeleteSDMxx
www.daringcoco.com
WIN A $200 GIFT CARD TO NET-A-PORTER OR SHOPBOP!
I wish my hair was long enough for this!
ReplyDelete