

Happy Tuesday guys! and happy tutorial number two:) I really love this style and am excited about posting it and hearing what you think, because it feels really classic to me and yet the size of these victory babies is pretty fun and extreme! Plus who doesn't like a little flower action? Okay lets get to it:
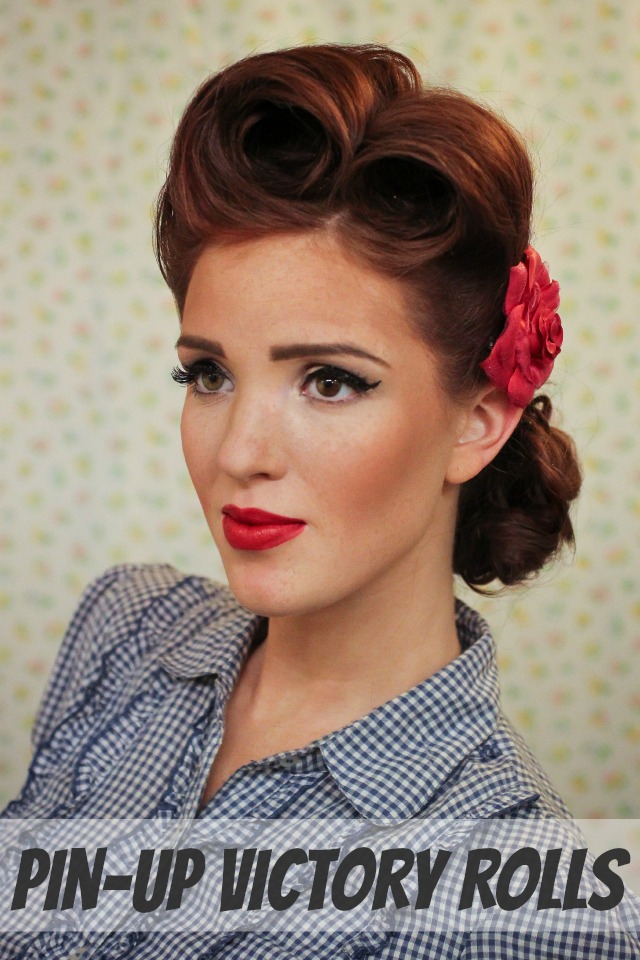 And there we have it! Big monster victory rolls in all their glory, with a curly bunch of fun at the nape of your neck. What'a you think? Wanna give it a try? I like to do these tutorials when I have errands to run or a date to go on, because I love the funny looks I get from kids.haha Okay well we'd better get on to the tutorial, because this ones a bit more complex and you know how I like to be thorough in my hairstyle explanations! K here we go:

Supplies needed:
- boar bristled teasing comb
- 1" curling iron
- bobby pins
- strong hold hairspray
- a hair-tie
Method:

Step #1: Start by drawing a curved line from temple to temple going upwards from one, and then back down to your other. Tie back the bottom of your hair for later. Draw a straight dramatic side part, and secure the larger section so it stays out of the way for the time being. Separate the top third of your smaller side of hair and begin gently teasing the underside from the root to about the end with a boar bristled teasing brush.
 Step #2: When you get to the bottom layer, tease the top of the hair. When you tease the larger side you'll do about 5 sections from top to bottom, and don't forget again to tease the top side of the bottom section, not the underside! Next you're going to draw a line of bobby pins on both sides about an inch in from your part to create a little base for the rolls. Go almost up to the front but not all the way. Going back to the smaller side first, comb your hair up and over the other side and then spritz with some hairspray once its smooth.
 Step #3: Brush the ends of your section slightly to combine them better, then clamp the ends into your curling iron so the hair is going in an inwards direction:) Roll all the way to your scalp, then by clamping and releasing repeatedly slowly release the iron from your hair while keeping the form of the roll.
 Step #4: Gently flatten the back of the roll and curl under to close off the back of the victory roll (since this is the more traditional look that we're going for), making sure to bobby pin well! Shape the front of the roll as needed, make sure to bobby pin the roll from the inside out, and spray well with hairspray. Repeat step #3 and #4 with the other side, and your rolls are done!
 Step #5: Let down the back of your hair, and comb it straight down and smooth. Pin another thick line of bobby pins holding your hair down this time from ear to ear, and spray the back of your head with hairspray. Almost done! :) Next you're gonna curl the hair with a 1 inch curling iron, tease the top 4-6 inches or so of the topside of your curls, and start bunching them at the nape of your neck. Secure your fluffy bunch of curls well with bobby pins, spray well with some good hold spray, and add a little flower or bow to the side to finish it all off!
Phew! That was probably the most explanation I've Ever had for a hair tutorial, but not only are these retro tutorials much more complex but this one in particular has lots of steps, and you know how I hate hate posting incomplete tutorials! So the words go on:) Its kinda fun though huh? The most important thing I can't stress enough this week though is that practice makes perfect and don't get discouraged!
Oh and one last thing: If you're not the biggest fan of hairstyle weeks, there are a few bonus posts coming this week that are pretty exciting, so be on the lookout!
Thanks for visiting today, and have a great rest of your day!
xo, Emmy


Gorgeous!
ReplyDeletehttp://style-squared.blogspot.ca/
https://www.facebook.com/StyleSquaredByZM
:) thanks lady!
Deleteomg ! amazing ;]
ReplyDeleteCome do my hair please!!! I'm obsessed with this! So gorgeous!
ReplyDeletewww.styleafterhours.com
This looks beautiful! I have such a soft spot for victory rolls.
ReplyDeletethe-creationofbeauty.blogspot.com
they're my favorite out of the retro styles. too fun:)
DeleteThis is beautiful!!! Your face was made for retro hairstyles, they suit you perfectly.
ReplyDeleteAs an aside, what lipstick are you wearing?? I love it! And could you do a tutorial on your eyebrows at some point? Yours are always flawless.
This look absolutely gorgeous on you!!!
ReplyDeleteStunning! You are so beautiful! I did a similar "pin-up" hairstyle for my engagement pictures! I'm in love with that look :)
ReplyDeleteoh that's so awesome! sounds like such fun pictures!
DeleteThis is so perfect!
ReplyDeletekatespitz.blogspot.com
So pretty. I love these retro tutorials -Hanna Lei
ReplyDeleteThanks Hanna! They are tons of fun.
DeleteI think you win the award for loyalest visitor and for the most comments by the way, you are the sweetest!
xo
Oh my gosh, I love this!
ReplyDeleteCarly
www.lipglossandcrayons.com
Oh WOW! AMAZING!!!
ReplyDeleteAMMAAZZZINNNGGG! I can not wait to try this. Unfortunately that's going to be forever from now while I am waiting for my hair to grow. Pinning it!
ReplyDelete- April
mylifeasapril.com
haha aww well hooray for forward thinking, and pinning! THanks lady!
DeleteYour hair is too awesome! I think I have too many layers to try this one, but pin-up styles are some of my absolute favorites.
ReplyDelete<3 Kassie
kitchenconvo.blogspot.com
I have several post-war pictures of both my grand-mothers with that hairstyle but the rolls were not as extreme :o)
ReplyDeleteHow long does it take ? I' m curious because one of them was pregnant with her first at the time ang given that post-war France was not the comfiest place on earth, I'm impressed that she could handle every day's issues but yet take the time to look so good ! (ha ! Now you got me thinking !)
Thank you for this post, it brings back a lot of sweet memories !
Yeah these are larger than traditional ones, modernized a bit maybe? Those women were amazing! They didn't have high tech curling irons like we do now, so that would definitely have added time, but if I did mine the way most people do(not wrapping and sliding off the curling iron) they'd probably take about 10 minutes per roll at the most? so not so bad, plus they probably were a lot faster because they were so practiced at doing them!
DeleteThanks for your comment, I love bringing back good memories:)
You look great, I love victory rolls too, their my favourite style to do on models probably, especially asymmetric ones like this! The back interest is cute too, great tutorial!
ReplyDeleteRaffles Bizarre Blog
LOVE it!!! Going to try very soon! Can you do a tutorial on the cat eye or even your eye makeup in general? It always rocks!
ReplyDeleteSure thing! I've been getting a lot of lovely ladies like yourself asking, and I have the best secret for it ever! So excited to share soon!
DeleteLove it! I see myself doing this for Halloween. :) You have the best tutorials!!
ReplyDeleteYou're so sweet! Yes halloween would be perfect, and now since this is the second week there are tons to choose from! also you can mix and match components for a customized look. Super fun:)
DeleteLove love love this hair style !
ReplyDeletexo,
Cindi
Breakfast at Cindi’s
Love this vintage look! I wish I could pull it off :)
ReplyDeleteRachel Emma
Daydream Frenzy
Thanks lady! and oh i'm sure you could:) The dramatic eyeliner and red lips help it look more period and therefore more natural I think? You should try it on a day when you don't need to see a lot of people in case you're not happy with it.haha just take pictures!
Delete:)
This looks almost impossible to achieve by yourself single handed. I wonder how you manage to do it. Do you have some tips that you can share?
ReplyDeleteThis is so cute! I used it to inspire my Halloween pinup girl costume! Thanks for posting!
ReplyDeleteJust found this, looks great, cant wait to try ! Thinks its going to be my christmas night out hairstyle x do u have make up tutorials too ??
ReplyDeleteWhat fun! I'm reading a book "War Brides" and will soon be getting together with friends to discuss it. It mentions "the new Victory Roll style" and I had no idea what it was. I'm 65 and most of my friends are younger, so I doubt they'll know either. On the night we meet, I'm going to try to do my hair like this so I can show them.
ReplyDeleteI love this style! Looks super easy and really nice. Question: can I use a round boar bristle brush instead or a rat tail comb? I don't have a boar bristled teasing brush.
ReplyDeleteI love your tutorials! Need to try to do them all. Greetings from Finland. :)
ReplyDeleteThis is so beautiful! I found a huge pin of your hair tutorials on Pinterest and I just can't stop staring. I absolutely love updos like this. They are so feminine and beautiful. You look stunning and I love your step by step directions! <3
ReplyDeletetoni
This was amazingly helpful! I'm performing in a show set in the 50s, and this was the absolute perfect hairstyle for my part. Thanks!
ReplyDeleteWow, I am so happy I found this web site!!! I love 50' hairstyles and Emily is soooo beautiful!!!!
ReplyDelete